

Lock Content Until Visitors Subscribe in Icegram Engage
ProGate premium blog posts, guides, or files behind an opt-in form using the Icegram Engage content locker and modal locking features.
A Content Locker gates access to your page or blurs the remainder of an article until the visitor completes an action—such as entering their email address in an opt-in form.
How Content Locking Works
In Icegram Engage Pro, content locking adapts based on the message type you select:
- Inline Messages (Article Gate): Embeds directly into the flow of your blog post or page. When the content locker is enabled, the inline message displays your opt-in form, and all paragraphs, images, and content located below that message are automatically blurred with an elegant frosted-glass blur effect. Visitors cannot read or interact with the subsequent content until they submit the form.
- Popup Messages (Modal Gate): Displays a focused popup over the entire page. The close button is removed, and clicking outside on the background overlay does not dismiss the window. Visitors must subscribe to unlock and access the underlying page.
- Overlay Messages (Screen Gate): Takes over the full screen or prominent viewport area without a dismiss button, requiring visitors to take action before accessing site content.
Step-by-Step Instructions
Option A: Gate an Article with an Inline Content Locker
To lock the rest of an article behind an inline subscription gate:
-
In your WordPress dashboard, navigate to
Icegram Engage→Campaignsand click Add New Campaign (or edit an existing one). -
Add a message and set its type to Inline.
-
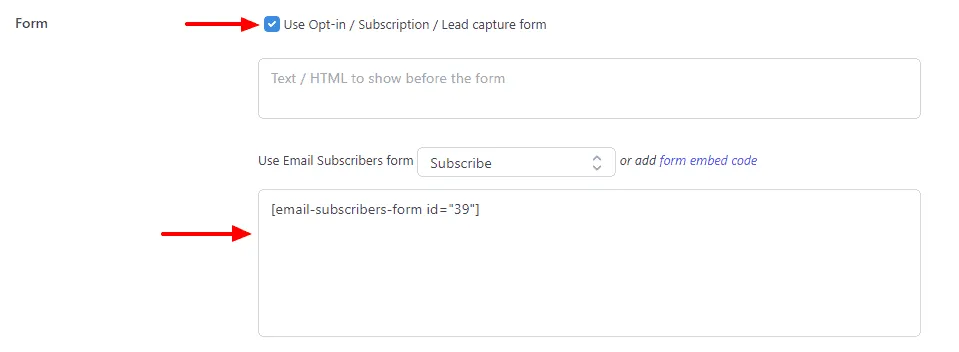
In the message settings, embed your lead capture form (using Icegram Express, Icegram Collect, Mailchimp, or custom HTML).
-
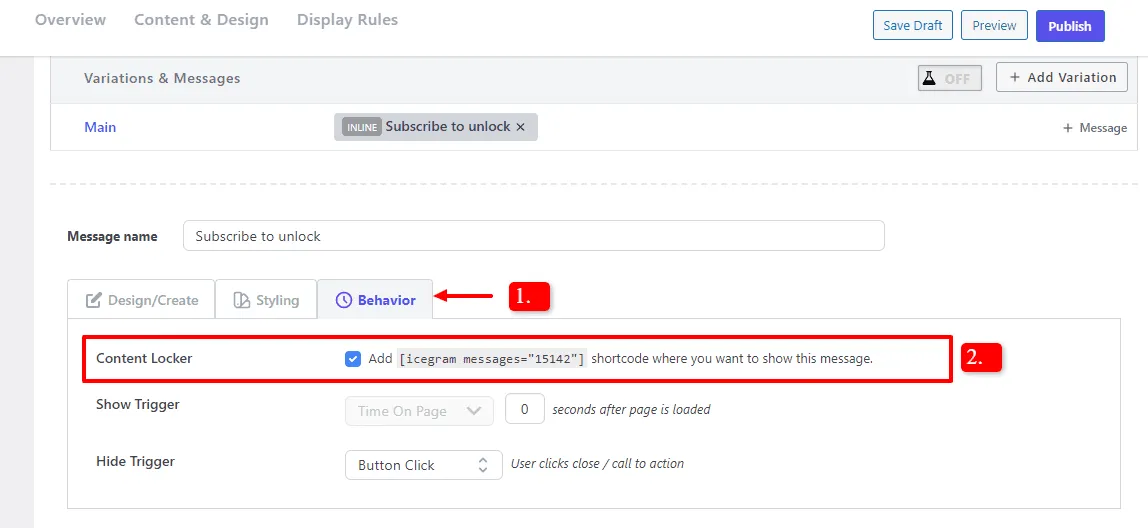
Scroll down to the Behavior Triggers section and check the Content Locker box.
-
When you check Content Locker, Icegram displays a prompt with your message shortcode:
[icegram messages="YOUR_MESSAGE_ID"]Copy this shortcode.
-
Open the WordPress post or page you want to gate in the WordPress editor (Block Editor or Classic Editor).
-
Place your cursor at the exact point where you want the lock to begin (for example, after the introductory paragraphs). Add a Shortcode block and paste
[icegram messages="YOUR_MESSAGE_ID"]. -
Save the post and publish your Icegram campaign.
When a visitor views the article, they will read up to your shortcode, see your opt-in offer, and find all following text and media blurred out. As soon as they enter their email and submit the form, the form processes seamlessly, the blur clears instantly in-place without reloading the page, and the visitor can read the full article.
Option B: Lock the Entire Screen with a Popup or Overlay
To prevent visitors from accessing the page entirely until they subscribe:
-
In your WordPress dashboard, go to
Icegram Engage→Campaignsand edit or create a campaign. -
Add a message and select Popup or Overlay.
-
Embed your subscription form in the message content.
-
Under Behavior Triggers, check Content Locker.
-
Under Where? / Display Rules, configure which pages, posts, or categories should trigger this campaign.
-
Save and publish your campaign.
When the campaign triggers, the popup or overlay appears on screen without a dismiss button, and background clicks are disabled. Once the visitor completes the subscription form, the message automatically dismisses and reveals the unlocked page.