General Plugin Settings
Go to your WordPress Dashboard → Icegram Express → Settings. You can modify the following options on it.
Tab 1 : General Settings
Sender : Choose a FROM name and FROM email address for all notifications emails to be send from this plugin.
Admin Email Addresses : Enter the admin email addresses that should receive notifications (separated by comma).
Opt-in type : There are 2 Opt-in options available,
(a) Double Opt-In - means subscribers need to confirm their email address by an activation link sent them on an activation email message
(b) Single Opt In - means subscribers do not need to confirm their email address.
Image Size : Select image size for {{POSTIMAGE}} shown in new post notification email. There are 3 options available,
(a) Full Size - Show full sized featured image when using {{POSTIMAGE}}
(b) Medium Size - Show medium-sized featured image when using {{POSTIMAGE}}
(c) Thumbnail - Show thumbnail sized featured image when using {{POSTIMAGE}}
note{{POSTIMAGE}} uses featured image of the blog post.
Track opens : Option to enable/disable tracking of email opens.
Track clicks: Option to enable/disable tracking of email link clicks. [Available in PRO version]
UTM tracking: UTM parameters are simply tags you add to a URL — when your link is clicked, the tags are sent back to Google Analytics and tracked. This is an option to enable/disable adding UTM parameters to your links. [Available in PRO version]
Allow user to select list(s) while unsubscribe : This will allow users to select particular lists from which they want to unsubscribe. [Available in Starter version]
Comment opt-in consent : If this option is enabled it adds a checkbox along with the comment form on the website and the label for the checkbox will be displayed from 'Opt-in consent text' field. Basically this option is to take consent from the visitors if they want to get subscribed to the list or not. [Available in Starter version]
Message to display after form submission : You can add/edit the message that you want to display after form submission on the website
Show unsubscribe message in email footer : While sending campaigns to your subscribers, Icegram Express by default adds unsubscribe message and link in the footer. You can edit the message from here
Subscription success/ error messages : In this there are 2 messages that you edit
(a) Success message - This success message is shown if contact is successfully subscribed from double opt-in (confirmation) email
(b) Error message - This error message is shown if any error occurred after clicking confirmation link from double opt-in
Subscription success/ error messages : In this there are 2 messages that you can edit
(a) Success message - This message appears when the contact clicks on unsubscribe link in the email. He/she will be redirected to a page where this message will be shown.
(b) Error message - This message appears if any error occured after clicking on unsubscribe link in the email
Share Icegram : Option to enable/disable 'Powered by' information that is shown when user clicks on the unsubscribe link.
Tab 2 : Notification Settings
Welcome email :Enable this option to send welcome email to subscriber after successfull signup.
(a) Subject: Enter the subject for the subscriber welcome email. This will be sent whenever a user's email is either confirmed (if Double Opt In) / subscribed (if Single Opt In) successfully.
(b) Content : Enter the content for the subscriber welcome email whenever a user's email is either confirmed (if Double Opt In) / subscribed (if Single Opt In) successfully. ( Keyword: {{FIRSTNAME}}, {{LASTNAME}}, {{NAME}}, {{EMAIL}}, {{LIST}}, {{UNSUBSCRIBE-LINK}} ).
Confirmation email : If double opt-in is set, contact will receive confirmation email with the below subject and content.
(a) Subject (Confirmation Email): Enter the subject for the confirmation email to be sent for Double Opt In whenever a new user signs up. The email will be sent with this subject whenever a user subscribes.
(b) Double Opt In Email Content (Confirmation Email) : Enter the content for the confirmation email to be sent for Double Opt In whenever a user subscribes. ( Keyword: {{FIRSTNAME}}, {{LASTNAME}}, {{NAME}}, {{EMAIL}}, {{SUBSCRIBE-LINK}} ).
Admin notification on new subscription :Enable this option to send admin email notifications for the new subscriber.
(a) Subject: Admin will receive an email whenever a new subscriber will signs up and confirmed. Enter the subject for that email.
(b) Content : Admin will receive an email whenever a new subscriber will be sign up and confirmed. Enter the email content for that email. ( Keyword: {{NAME}}, {{EMAIL}}, {{LIST}} )
Admin notification on every campaign sent :If this option is enabled admin will receive an email for every campaign sent.
(a) Subject: Enter the subject for the sent email report.
(b) Content : Admin will receive an email for every campaign email sent. Enter the content for the sent email report. ( Keyword: {{DATE}}, {{SUBJECT}}, {{COUNT}} )
Tab 3 : Email Sending Settings
Cron job URL : It is the Cron URL which is unique to your site and will execute Cron jobs. It is advised not to modify this link.
Disable WordPress Cron : Enable this option only if you do not want Icegram Express to use WP-Cron to send emails.
Send emails at most every : This option is useful premium version of the plugin. Based on this interval emails will be sent out. For eg. If it is 15 mins, then each batch of emails will be sent out at an interval of 15 mins
Maximum emails to send in an hour : It defines the number of emails that you can send per hour. The default value is 300. If you want to increase the same, contact your System Administrator / Host Provider and ask them what is the maximum number of emails you can per hour. You can then set the same value here.
Maximum emails to send at once : It defines the number of emails that you want to send on every cron request/batch. The default value is 30. You can increase it as per 'Send emails at most every' field
Send test email :You can add an email address here and click on Send Email in order to test if email is being sent or not from the plugin.
Select a mailer to send mail : By default, Icegram Express sends emails through WP Mail. If you want you can use other mailers provided under this option. Many of the mailers are for the PRO version of the plugin.
Tab 4 : Access Control Settings
It allows you to set user roles who can access menus of Icegram Express. Only site admin can change this setting.
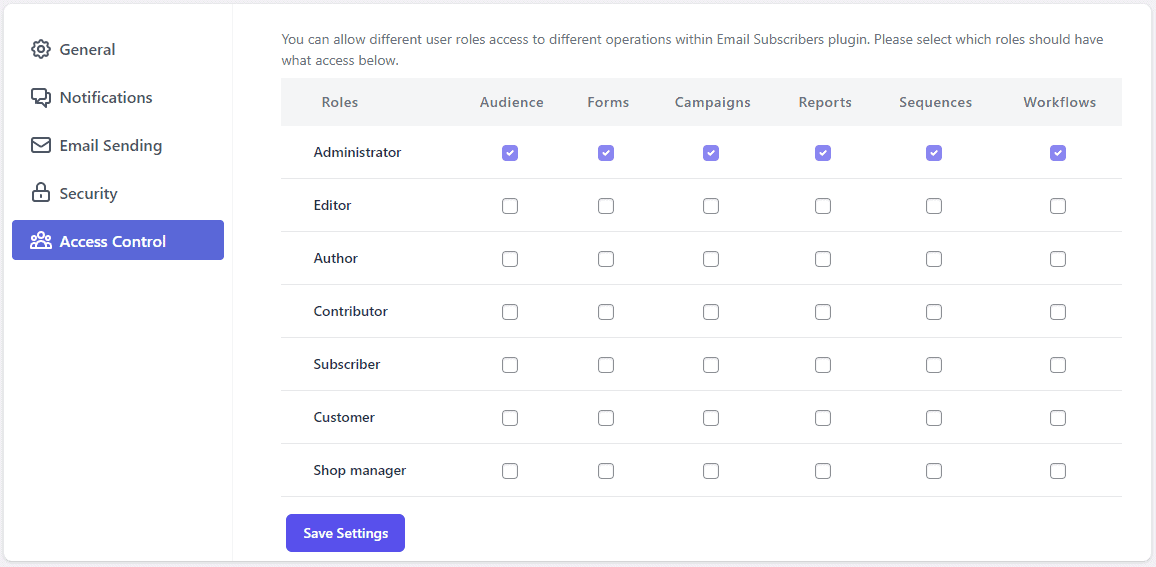
Settings and Help & Info menu will be visible to all user roles and are purposely exempted from user roles settings.